Battery switch on travel trailer function is crucial for managing your RV’s power. Understanding how these switches work—whether it’s a simple 1-2-both switch or a more complex disconnect—is key to preventing electrical issues and ensuring a smooth camping experience. This guide breaks down everything you need to know, from choosing the right switch to troubleshooting common problems.
We’ll cover different switch types, safe connection and disconnection procedures, troubleshooting tips, maintenance advice, and how your battery switch integrates with your travel trailer’s overall electrical system. By the end, you’ll be confident in handling your RV’s power system.
Connecting and Disconnecting Batteries: Battery Switch On Travel Trailer Function
Properly connecting and disconnecting your RV batteries is crucial for safe and reliable operation. A faulty connection can lead to damage to your electrical system, your batteries, or even pose a safety risk. This section details the correct procedures to ensure you avoid these issues.
Working with RV batteries requires caution. They contain corrosive acid and can generate sparks if handled incorrectly. Always wear appropriate safety gear, including eye protection and gloves.
Battery Switch Operation
Most RVs utilize a battery switch to control power to the house batteries and potentially the chassis battery. This switch allows you to disconnect the house batteries completely, preventing parasitic drain when the RV isn’t in use. Understanding how your specific switch works is vital.
Typically, the switch has multiple positions, often including “Off,” “Both,” “Battery 1,” and “Battery 2,” allowing you to isolate or combine battery banks. Consult your RV’s manual for the exact configuration and operation of your battery switch. Incorrect switching can lead to unexpected short circuits.
Safe Battery Connection Procedures
Before connecting or disconnecting any battery cables, always ensure the battery switch is in the “Off” position. This prevents accidental shorts or sparks.
- Identify the Positive (+) and Negative (-) Terminals: These are clearly marked on the battery itself. The positive terminal is usually larger.
- Clean the Terminals: Use a wire brush or terminal cleaner to remove corrosion from both the battery terminals and the cable ends. Corrosion can hinder connection and lead to voltage drop.
- Connect the Positive Cable First: Attach the positive (+) cable to the positive terminal of the battery, ensuring a secure connection. Tighten the cable clamp firmly.
- Connect the Negative Cable: Next, connect the negative (-) cable to the negative terminal. Again, ensure a tight connection.
- Reconnect the Battery Switch (if applicable): Once the cables are connected, turn the battery switch to the desired position (“Both” to use both batteries, “Battery 1” or “Battery 2” to use only one, or “Off” to disconnect).
Safe Battery Disconnection Procedures
Disconnecting batteries should be performed with equal care. Reversing the connection steps is the safest method.
- Turn the Battery Switch to “Off”: This is the first and most crucial step to prevent accidental short circuits.
- Disconnect the Negative Cable First: Loosen and remove the negative (-) cable clamp from the battery terminal.
- Disconnect the Positive Cable: Then, loosen and remove the positive (+) cable clamp.
Consequences of Incorrect Battery Connection
Connecting batteries incorrectly can result in several problems. A reversed connection can cause sparks, potentially igniting flammable materials near the battery. It can also damage the battery itself, potentially leading to explosions or acid leaks. Furthermore, incorrect connections can damage the RV’s electrical system, leading to expensive repairs.
Safety Precautions When Working with RV Batteries
Always prioritize safety when handling RV batteries. These precautions should be followed to mitigate risks.
- Wear safety glasses and gloves to protect against acid splashes and corrosion.
- Work in a well-ventilated area to avoid inhaling potentially harmful gases.
- Have baking soda and water readily available to neutralize any spilled battery acid.
- Never work near open flames or sparks.
- If unsure about any procedure, consult a qualified technician.
Battery Switch Maintenance and Upkeep
Keeping your travel trailer’s battery switch in top condition is crucial for reliable power and to prevent costly repairs down the road. Regular maintenance ensures your batteries deliver consistent power, extending their lifespan and preventing unexpected power outages during your adventures. Neglecting maintenance can lead to corrosion, poor connections, and ultimately, battery failure.Proper maintenance involves a combination of regular inspections and cleaning.
This preventative approach is far more effective and less expensive than dealing with problems after they arise. A proactive strategy will save you time, money, and frustration on the road.
Battery Switch Maintenance Schedule
A recommended maintenance schedule for your travel trailer’s battery switch includes a visual inspection every three months and a thorough cleaning and inspection at least once a year, or more frequently if you live in a particularly humid or corrosive environment. More frequent checks are also advised after extended periods of non-use or exposure to harsh weather conditions. Consider adding a spring and fall inspection to your routine if you store your trailer outdoors.
Cleaning and Inspecting Battery Terminals and Connections
Cleaning your battery terminals and connections is a straightforward process that significantly impacts battery performance. Begin by disconnecting the negative (-) terminal first, followed by the positive (+) terminal. This prevents accidental short circuits. Use a wire brush or terminal cleaner to remove any corrosion, dirt, or debris from the terminals and the connecting clamps. A baking soda and water paste can also effectively neutralize acid buildup.
After cleaning, apply a thin layer of dielectric grease to the terminals and connections. This prevents future corrosion and ensures a clean, reliable connection. Inspect the wires for any signs of damage, fraying, or loose connections. Tighten any loose connections using the appropriate wrench. Remember to reconnect the positive (+) terminal before the negative (-) terminal.
Preventing Corrosion on Battery Terminals
Corrosion is the biggest enemy of your battery terminals. It inhibits current flow, leading to reduced battery performance and potentially premature failure. Besides the cleaning process described above, several preventative measures can be taken. Regularly inspect the battery box for any signs of moisture or leaks. Ensure proper ventilation to prevent the buildup of moisture and acid fumes.
A battery box cover can help shield the batteries from the elements. Using anti-corrosion terminal protectors, which are small plastic caps that fit over the terminals, is another effective method. Consider using a battery tender or trickle charger to maintain a consistent charge and prevent sulfation, a common cause of battery degradation. Remember, a little preventative maintenance goes a long way in ensuring your batteries stay healthy and your travel trailer runs smoothly.
So, you’re planning a trip? Awesome! First things first: get yourself sorted with travel insurance. Check out Aon travel insurance for comprehensive coverage. Once that’s done, you can focus on the fun stuff, like setting up your perfect travel soundtrack. If you’re an audiophile, you’ll want to check out this audiophile travel setup guide to ensure your listening experience on the go is top-notch.
It’s all about making sure you’re covered and prepared for the adventure!
Battery Switch and Electrical System Integration
The battery switch is the central nervous system of your travel trailer’s 12-volt DC system, controlling the flow of power from your batteries to the various appliances and systems. Understanding its integration is key to troubleshooting and maintaining your RV’s electrical setup. It’s not just an on/off switch; it’s a critical component for managing power distribution and preventing potential electrical issues.The battery switch acts as a gatekeeper, selectively routing power from your batteries (or shore power via the converter) to different parts of your RV’s electrical system.
In its simplest form, it allows you to disconnect your house batteries completely from the rest of the system, preventing unwanted battery drain when the trailer is stored. More sophisticated switches allow for different configurations, such as running only essential systems, or connecting to shore power without draining your batteries. This control is crucial for preventing battery damage and ensuring the longevity of your electrical components.
So, you’re planning a trip? Awesome! First things first: get travel insurance. Check out Aon travel insurance for some solid options; they’ve got you covered for pretty much anything. Then, if you’re an audiophile like me, don’t forget your tunes! Setting up your audiophile travel setup is key for enjoying those epic playlists on the go.
Make sure you pack accordingly, including chargers and adapters!
Power Distribution Management
The battery switch’s primary function is to manage the flow of power from your batteries to the various DC loads in your travel trailer. This includes lights, water pumps, fans, and other 12-volt appliances. By switching the batteries on or off, you control whether these devices receive power. A well-maintained switch ensures a clean, reliable power supply to these components.
A faulty switch can lead to inconsistent power, malfunctions, and potential damage to your appliances. Consider the switch as the main distribution point for your house battery power.
Interaction with Other Electrical Components
The battery switch interacts closely with other key components in your RV’s electrical system. The converter, which transforms 120-volt AC shore power to 12-volt DC, typically charges your batteries and may draw power from them. The inverter, which converts 12-volt DC to 120-volt AC, supplies power to your 120-volt appliances when you’re not connected to shore power. The battery switch manages the flow of power between these components and your batteries, ensuring that the system operates correctly and prevents conflicts.
For instance, it’s vital to have the battery switch in the correct position to charge your batteries when connected to shore power.
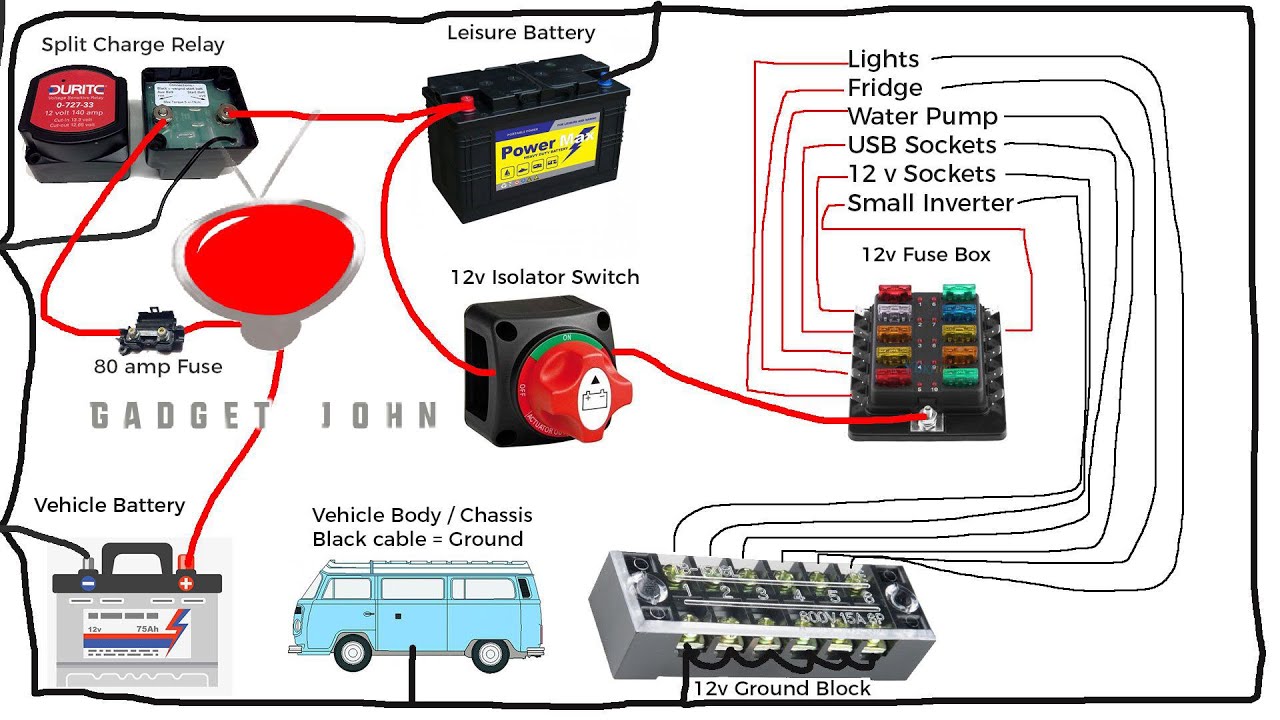
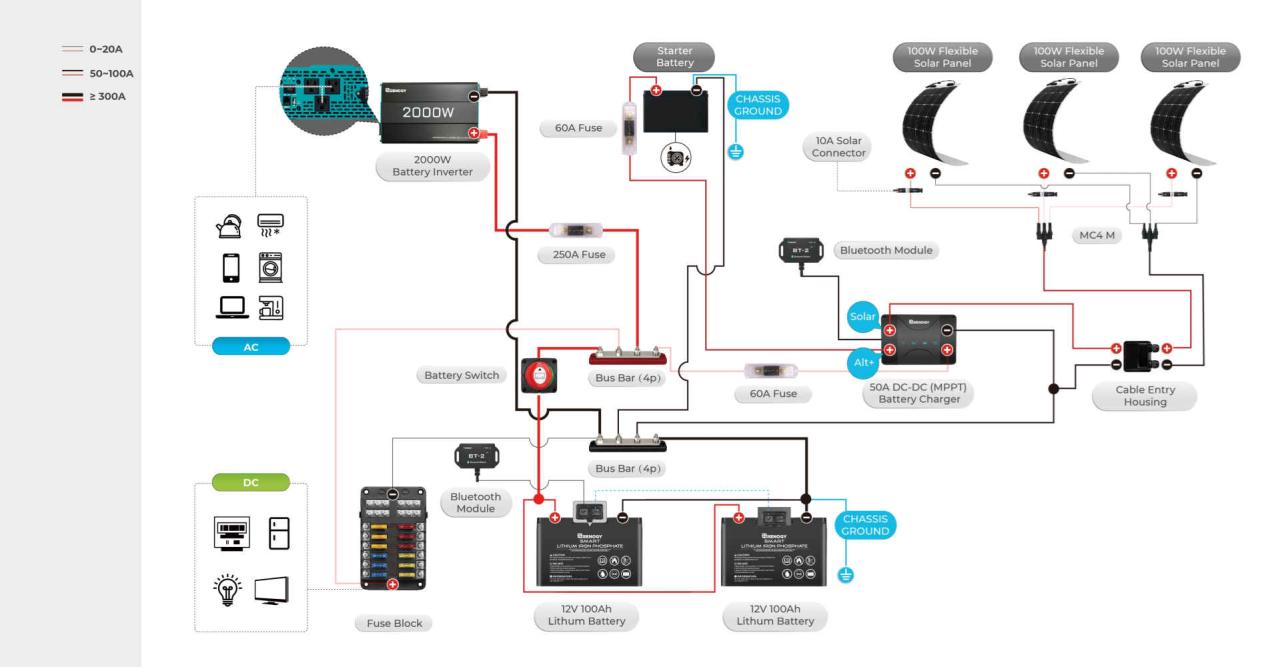
Simplified Electrical System Diagram
This diagram represents a simplified view of a travel trailer’s electrical system. It shows the flow of power from the batteries, through the battery switch, to various components. It does not include all possible connections or complexities found in real-world systems.
[Battery] –(Wire)–> [Battery Switch] –(Wire)–> [Converter] –(Wire)–> [120V AC Outlets/Appliances]
[Battery] –(Wire)–> [Battery Switch] –(Wire)–> [12V DC Appliances (Lights, Pump etc.)]
[Battery] –(Wire)–> [Battery Switch] –(Wire)–> [Inverter] –(Wire)–> [120V AC Outlets/Appliances]
[Shore Power] –(Wire)–> [Converter] –(Wire)–> [Battery] (Charging)
Selecting the Right Battery Switch
Choosing the right battery switch for your travel trailer is crucial for safe and reliable power management. A poorly chosen switch can lead to overheating, damage to your batteries, or even electrical fires. This section will guide you through the key factors to consider when making your selection.
Factors to Consider When Selecting a Battery Switch
Several factors influence the selection of an appropriate battery switch. These include the number of batteries in your bank, the amperage draw of your appliances, and your desired mounting style. Understanding these aspects will ensure you choose a switch capable of handling the demands of your system. Ignoring these considerations could result in an underpowered switch leading to potential issues.
Battery Switch Amperage Rating
The amperage rating of your battery switch is paramount. It indicates the maximum current the switch can safely handle. Choosing a switch with an insufficient amperage rating can lead to overheating and potential failure. To determine the appropriate amperage rating, consider the total amperage draw of all devices connected to your battery bank. A good rule of thumb is to select a switch with an amperage rating at least 25% higher than your anticipated maximum draw.
For example, if your appliances have a combined maximum draw of 100 amps, a 125-amp switch would be a suitable choice. This safety margin ensures the switch doesn’t operate near its maximum capacity, reducing the risk of overheating. Remember to factor in the starting current of your appliances, which can be significantly higher than their running current.
Examples of Battery Switches
Here are some examples of battery switches commonly used in travel trailers, illustrating the variety of options available:
| Brand | Model | Amperage Rating | Key Features |
|---|---|---|---|
| Blue Sea Systems | 7610 | 150 Amps | High-quality construction, positive/negative switching, easy installation |
| Perko | 0094DP2CHR | 150 Amps | Durable, waterproof design, suitable for marine and RV applications |
| AGS | Various Models | Varies (check specific model) | Automatic switching based on battery voltage, ideal for dual battery systems |
Note: Specifications and availability may vary. Always check the manufacturer’s specifications before purchasing. The AGS switches are automatic and offer more advanced features, but they are usually more expensive than manual switches.
Determining Appropriate Amperage Rating, Battery switch on travel trailer function
To determine the appropriate amperage rating for your battery switch, you need to calculate the total amperage draw of all devices connected to your battery bank. This includes everything from lights and water pumps to air conditioners and refrigerators. Consult the specifications of each device to determine its amperage draw. Then, sum up the amperage draw of all devices.
Add a safety margin of at least 25% to account for inrush currents (the high current drawn when a device initially starts up) and potential future additions to your system. This will give you the minimum amperage rating required for your battery switch. For instance, if the total calculated amperage draw is 80 amps, adding a 25% margin results in a required amperage rating of 100 amps or higher.
Therefore, a 125-amp or even a 150-amp switch would be a safer choice.
Mastering your travel trailer’s battery switch is a simple yet powerful way to enhance your RV adventures. From preventing costly repairs to ensuring safe operation, understanding its function is invaluable. Remember regular maintenance, safe practices, and don’t hesitate to consult a professional if you encounter problems you can’t resolve. Happy travels!
FAQ Resource
What size battery switch do I need?
The correct amperage rating depends on your battery bank’s capacity. Consult your battery’s specifications and choose a switch with a higher amperage rating than your battery bank’s output.
How often should I clean my battery terminals?
Clean your battery terminals at least twice a year, or more often if you notice corrosion. Use a wire brush and baking soda solution to remove buildup.
My battery switch is making a clicking noise. What’s wrong?
A clicking noise often indicates a loose connection or a faulty switch. Check all connections and consider replacing the switch if the problem persists.
Can I use a different type of battery switch than what came with my RV?
Yes, but ensure the replacement switch has the correct amperage rating and is compatible with your RV’s electrical system. It’s always best to consult your RV’s manual or a qualified technician.
